

Whether you use an iPhone or an Android, with Merlin Sound ID and good technique, you can use your smartphone to make recordings to add to an eBird checklist. Learn how to make the most of recording with a smartphone.
Quick tips
Apps and settings
Record with Merlin Bird ID and save the recording
Share directly to the eBird app, then trim and upload your recordings
Field techniques
Be intentional—choose one bird and record it
Get closer—the closer you are to the bird, the better the recording
Point the microphone toward the bird and keep noise like traffic behind you
Stay still—any little movement will introduce unwanted noise to the recording
Best practices
Aim for 30 seconds or longer when recording a bird
Independently verify the identification (don’t rely on Merlin or other ID apps to determine the species)
eBird upload
Choose files where the focal species is clear and easy to hear
Share the file to an open eBird checklist
Trim to focus on the intended/target bird sound, but don’t trim too tightly
Add metadata and comments
Submit or save your list
Use Merlin Sound ID or another recording app that makes .WAVs
To make the most out of your smartphone recordings, you’ll need to download a recording app that allows you to record in .WAV format. The Sound ID feature in Merlin Bird ID from the Cornell Lab of Ornithology records in .WAV format, and recordings you make with Merlin can be shared via email, messaging, or the cloud, making it easy to transfer your recordings for later processing and archiving. You can now even add recordings directly from Merlin to the eBird app to upload them directly from your phone.
Other recording apps that allow you to record in .WAV format include Voice Record Pro for iOS, and RecForge II and Hi-Res Audio Recorder for Android, among many others. Avoid built-in voice memo apps, which typically record at low resolution.
Use good recording technique
Good recording technique will always improve your recording, whether you are using a smartphone or professional recording equipment. Remember, your phone is designed to capture a very loud sound (your voice) at close range, but most bird sounds are relatively soft and distant. If you make noise while recording a bird sound—by talking, walking, or moving the phone in your hand—your smartphone is going to pick up the noise that you are making much better than the bird sound. With that in mind, follow these tips to make the best possible recording with your smartphone:
Focus on a single bird vocalizing
Get close to the bird, if you can do so without disturbing it
Know which microphone your phone is using and keep it clear of any obstructions
Point the microphone at the subject
Try to point the microphone away from background noise
Hold the phone gently or rest it against a stable surface if possible
Don’t move or talk while you are recording
Make a voice announcement at the end of the recording to keep track of the species and its behavior
For more recording tips, check out the audio recording tips page.
External microphones for smartphones
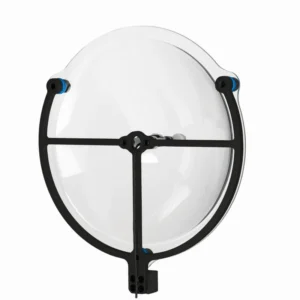
A variety of external microphones are available specifically for smartphones. Many are so small that they don't make much of a difference but others can help make the recording sound more natural. If you have a shotgun microphone or a parabolic reflector but not a recorder, a simple cable or adapter can allow you to connect these microphones to your smartphone. These types of highly directional microphones make an enormous difference in recording quality. Check out our mobile phone microphone suggestions for more information.
eBird mobile upload
Starting in August 2026, the eBird mobile app now accepts audio files from Merlin and other recording apps, allowing you to add them to your checklist before upload.
How to Add Sound Recordings to your Checklist
1. Make an eBird checklist and record sounds that you hear at the same time, using your favorite recording app (we recommend Merlin Bird ID).
2. Make sure the appropriate checklist is open in eBird Mobile. Recordings can be attached to any actively running checklist, as well as both Not Submitted and Submitted checklists. For submitted checklists, tap the Edit button to open it and add recordings.
3. Share the recording to eBird from your recording app. In Merlin, open a Sound ID Session, tap the share icon, and choose eBird.
4. Follow the prompts in eBird Mobile to finish adding the sound recording to your list: choose the focal species, trim the start and end to remove handling noise and focus on the bird, and add notes about the recording.
5. Repeat for any other recordings you want to upload that were made during that checklist. You can add more than one recording per species if you record multiple birds or different call or song types.
That's it! Your recordings upload when you hit submit or save.
eBird web upload
If you don’t want to upload from your phone, you can back up your recordings to your computer, then upload via the eBird website by finding your eBird checklist and clicking “Add Media.” Before uploading, don’t forget to follow the guidelines for preparing your sound files. Recordings made with a smartphone are often quiet, so it is important to follow our suggestions and remove handling noise at the beginning and end of the recording before uploading.
FAQ
Q: My recording app has a lot of settings. Which ones should I use?
A: Another great feature of the Merlin Bird ID app is that you don’t have to worry about choosing any technical settings—our team at the Macaulay Library has already done that for you! We highly recommend switching to Merlin.
If you still want to use a different recording app, it’s important to check your settings. In almost all cases, you can choose your settings once and your preferences will be saved for future recordings. Menus vary between apps, but these are some of the most common and important ones.
File type—Always select .WAV, an uncompressed file format that gives better results than compressed files like .MP3s and .M4As. Why WAV? Learn more.
Recording quality—Set this to the highest possible option. Some programs give simplified options, such as “Low” or “High,” while others will let you choose sample rate and bit depth settings. We recommend a sample rate of 48 kHz (at least 44.1) and a bit depth of 32 bits (at least 24 bits).
Channels—Most phones are only able to record audio in mono, so this is the best option to choose. With the “Stereo” option, the audio will often record two identical channels, unnecessarily doubling the size of the sound file.
Automatic gain control—Often labeled AGC, this functionality should be turned off on your app so you can control the record level manually.
Noise reduction or AI—Anything labeled suppression, noise reduction, enhance, or AI should be avoided.
